14th century ceramic plate and bowl
by Antoinette Travaillie

Figure 1: 1400's Albarello/Apothacary/Pharmacy Jars, tin glazed earthenware, Florence, Italy. Met Museum, Accession No. 46.85.11
I found the pharmacy jar depicted in Figure 1 while trolling through someones Italian Ceramic board on Pinterest. I fell in love with it. I quite like the dark blue on white in ceramics and this fish looked so Dr. Seuss I just had to use the design elements in a project.

Figure 2: Monochrome drug jar. late 12th - early 13th century, Iran Kashan. Stonepast, lustre-painted over opaque white glaze. Met Museum, Accession Number 2013.255
"Drug jars, or albarello, contained
medicines, ointments and cosmetic preparations and would have been
bought at an apothecary's shop. You could either keep the pot after the
contents were finished and use it as a container, or you could return it
to the shop in exchange for a small sum. It would have been sealed with
a parchment lid, tied on with string just under the rim." - (Museum of London, website accessed 4/12/14)

Figure 3: Drug Jar, Beauvais, France. Early 16th Century. Decoration
is scratched through top coat of white slip to reveal red slip
underneath, then embellished with blue and green glaze. Museum of London, ID no A4925
Background
Albarello (or Albarelli) appear to have originated in the middle-east (Figure 2) and the tradition brought westwards over time. They have a cylindrical shape, often with a slight rim around the lip. The jars are sealed with a piece of parchment which is tied on with string. This allows the pharmicist to write the contents on the jar, and for the jar to be reused for other products later. Some jars, such as the one in Figure 3 at the Museum of London have labels written in glaze, 'VA T'EN QUITTE' (possibly meaning 'get out of here') may indicate an expensive or toxic concoction. Decorative elements seem to a simpler version of what was utilised on other ceramics at the time and display the regional style trends.
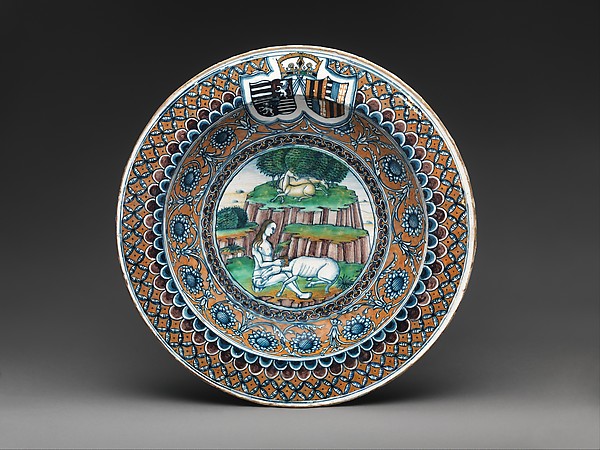
Figure 4: Dish depicting a virgin and a Unicorn. Tin-glazed earthenware.
Italian.1486-1489. Met Museum of Art. Accession number 46.85.30
Around the time the apothecary jars in Figure 1 were produced, Italian ceramic plates and
bowls were transitioning into the majolica design style which involves an
intricate use of colours (Figure 4). There were
many workshops with Italy producing ceramics which were exported
throughout Europe - Deruta and Faenza for example. From the 1400's to the 1500's, many new glaze colours were introduced to the Italian ceramics market. Copper and cobalt based glazes (greens and blues) were soon paired with manganese purples and browns. Later vibrant reds and yellow (antimony) also decorated earthenwares. Though no firm date is given for the extant Albarello, I believe it was produced in the early 1400's due to it's simple colours and Hispano-Moresque motifs. Similar floral background motifs can be seen in the charger in Figure 5.

Figure 5: Dish, Tin-glazed earthenware. Tuscany, Italy. Met Museum, Accession Number 46.85.1
#Method
Shape - I use commercial bisque as I do not own a kiln and do not have the skills to fashion my own clay items. As a result, the shapes I select for my work are restricted to those that are available. In some ways this is in keeping with medieval practices where earthenware objects were sometimes produced in one workshop and glazed in another. The bisque I selected for this project were as close
to the shape of extant objects (Figure 4) as I could acquire. The bowl
has slightly steeper sides and a deeper base than the one depicted. This has the
added benefit that it can accommodate the more liquid soups or smaller
portions that are often eaten at SCA events. The shape of plates produced in Italy at this time were quite varied, from wide rim (or rims) to none at all. The bisque I selected for the plate is a common shape even now and quite similar to many extant items including that depicted in Figure 6.

Figure 6: Plate with the Visconti arms. Deruta? Italy. 1480 - 1500. Tin-glazed earthenware. Met Museum, Accession Number 46.85.16
Glaze - Tin-glazed earthenware is pottery which is coated in a glaze containing tin oxide. This leaves
an opaque white base upon which metallic oxides are painted. The blue on the extant Albarello is probably derived from cobalt oxide (or Persian blue).
As I wished to create items that would be food safe I needed to avoid lead or other toxic metallic oxides. As I am using commercial bisque made out of white clay, I can skip the tin-oxide all together by using underglaze to paint the design then a clear overglaze to seal the ceramic and make the white shine as if it were tin-glaze. This has the added benefit of making my work food, microwave and dishwasher safe. The underglazes I use are purchased from Glazeit, a company in Victoria who also fires my pieces. The glazes are all designed to be fired at the same temperature which means I don't have to do multiple coats or worry about one getting burnt before the other runs.

Figure 7: Original design sketch for the plate and bowl
The Process - I started by making the
bowl as close to the original design elements because it was smaller and
easier to handle while glazing. Originally I was going to have the same
design on both items (Figure 7) and just change up the rim decoration but
the curved sides of the bowl made that too difficult. As a result the
bowl is very close to true-to-reference, design wise.Once
I'd finished the bowl, I decided to change the design for the plate
rather than have it perfectly matching. Due to the difference in curves
and size I could make it close to my original design sketch.
Each
item was glazed in a staged process-
the main elements were outlined
then the central background fill was completed. The main elements were
then covered with a 1part glaze, 3 parts water wash. This is a new
process for me which I hoped would create some shading in the glaze
similar to what can be seen on the original piece. As the glaze turns
opaque before firing, it is really difficult to see how much coverage
the final product will have. After completing the center of the piece, I
worked on the back. The whole back is glazed before the rim of the
front is completed. This prevents the front design (the most important
part) from rubbing off while the back is being completed. It is less important if the back of the design loses colour depth due to
unintentional rubbing.

Outline of the fish - three layers of glaze to ensure strong consistent colour.

Background fill complete - one layer of glaze as delicate swirls will thicken if more is applied.

The fish were then glazed with a 1 part glaze, 3 parts water wash. I wasn't 100% sure how well this'd turn out as I hadn't tried this before but I needed some shading effects here.

The back is started before the front rim to reduce rubbing and removal of glaze as I work. Flower motif has been borrowed from the background of the Albarello.

Back rim is completed with two lines of floral pattern taken from the
rim of the apothecary jar. Inner ring is the upper rim of jar, outer
ring is the almost flat ring near the top of the jar. Mistake between the first flower and leaf has been scratched off to leave the white ceramic in it's place.

Front rim is completed with a similar pattern to the back and to the bowl.The piece is now ready to be fired and will darken during the process.
Results

The fired plate and bowl!

Fired back of the plate and the bowl.
Things I liked:
I liked how easily the 1400's motif transitioned into a Dr. Seuss theme. That said, I think I like the front of the bowl better than the plate. The rim decoration on the plate needs to be that little bit tighter or more busy to claim the space better.
I liked how easily the 1400's motif transitioned into a Dr. Seuss theme. That said, I think I like the front of the bowl better than the plate. The rim decoration on the plate needs to be that little bit tighter or more busy to claim the space better.
I'm also really happy with how the wash turned out. I was worried it'd be too dark and the fish scales wouldn't come through. I was also worried that the brush strokes would be too obvious
Things I'll fix next time:
Upon close inspection the overglaze on the rim of the bowl hasn't fully run and is slightly matt in places. This is due to it not quite reaching the required temperature in the kiln which may have resulted from over crowding. While this isn't something I have control over, I can drop my items off at a different time in the week, hopefully catching a firing that's less crowded.
I'm also not entirely 100% happy with the back of the bowl. Though I deliberately made the decision to keep the sides of the bowl glaze free as I didn't think the motifs would follow the flare well, I'm not sure I like the stark nature of it. Though I won't do this design again, I think it'd probably have looked better with flowers and swirls.
I'll probably be writing up a review on blue-on-white ceramics in the near future which I'll throw up here and link to this project (and my ongoing tiles project), - stay tuned!
No comments:
Post a Comment